Salta il contenuto

FANUC Robot Maintenance Guide: Controller Basics, Common Faults & Preventive Service

Industrial robots rarely fail without warning.

In most FANUC systems, early symptoms usually appear first through the controller, teach pendant, servo amplifier, or communication system.

A frozen teach pendant, random servo shutdown, emergency stop alarm, or intermittent controller reboot often indicates deeper electrical or mechanical issues developing inside the robot system.

Understanding how the FANUC robot controller, cabinet, servo system, and maintenance cycle work together is essential for reducing downtime and preventing unexpected production stops.

This guide covers:

  • FANUC robot structure and axis configuration
  • R-30iB control cabinet components
  • Troubleshooting common FANUC fault symptoms
  • Step-by-step preventive maintenance procedures
  • Lubrication protocols and battery service intervals
  • Root causes of servo and communication failures

Robot Structure & Core Components

Industrial robots consist of multiple servo-driven axes connected through reducers and mechanical joints. Each joint represents one degree of freedom, allowing the robot to perform complex motion with high repeatability and precision.

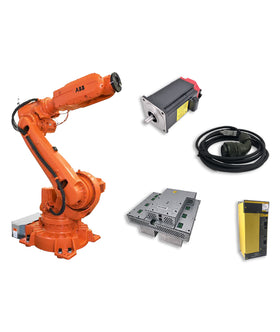
The complete robot system is composed of:

  • Control cabinet: The central "brain" that processes motion commands and manages safety circuits.
  • Robot mechanical structure: The physical arm that executes movement instructions.
  • Servo system: Servo motors and amplifiers that drive the joints based on controller feedback.
  • Teach pendant: The primary human-machine interface (HMI) for programming and diagnostics.
  • Power and signal cables: Heavy-duty cabling that links the cabinet to the robot structure, ensuring the transmission of information and energy.

Industrial robots are widely utilized across manufacturing for welding, material handling, assembly, palletizing, machine tending, and inspection applications. As automation systems advance, these components are increasingly integrated with PLC systems, vision networks, and factory safety scanners.

FANUC Robot Core Control Device

The Robot Base

The robot base supports the entire weight of the structure and absorbs intense vibrations generated during high-speed movements or sudden payload changes. A stable, securely mounted base is crucial for motion accuracy, repeatability, load stability, and collision resistance. Improper installation can introduce microscopic base shifts, causing encoder deviation or long-term mechanical wear.

Electrical Safety Note: Most FANUC robot bases feature a dedicated grounding terminal. Proper grounding to the earth is essential for electrical safety, preventing current leakage, reducing electrical interference, and suppressing servo/encoder signal noise.

Servo Motors & Axis Configurations

Each FANUC robot axis is controlled by an independent servo motor and an optical encoder feedback system. Typical 6-axis configurations include:

  • J1: Base rotation
  • J2: Lower arm forward/backward
  • J3: Upper arm up/down
  • J4: Wrist rotation
  • J5: Wrist bending
  • J6: Tool rotation

Servo accuracy directly determines path precision and cycle times. Over time, high duty cycles can introduce encoder instability, servo overheating, reducer backlash, lubrication contamination, and cable fatigue.

Related reading:

FANUC Servo Motor and Axis Components

The Control Cabinet Architecture

The FANUC control cabinet acts as the operational core of the robotic system. It houses the primary processing units, power modules, input/output (I/O) interfaces, and vital safety systems.

FANUC R-30iB Control Cabinet Internal Layout

Main Controller Board

The R-30iB control cabinet contains the main CPU board, DRAM modules, FROM/SRAM memory modules, servo control cards, I/O boards, and the power supply unit (PSU). These components process programs and adjust instructions dynamically based on real-time feedback. Hardware or memory instability here can lead to random reboots, teach pendant lockups, program corruption, or sudden communication drops.

Related reading:

Servo Amplifier System

The servo amplifier converts incoming factory electrical power into precise, controlled three-phase motor output for each axis. It continuously monitors motor current, temperature, encoder signal integrity, and axis loads. Intermittent overcurrent or regenerative circuit alarms often show up weeks before a total amplifier failure occurs.

Related reading:

Cooling & Power Distribution

The rear section of the cabinet houses the cooling fan unit, main transformer, and regeneration resistors. The transformer steps down factory voltage for the electronics, while the resistors bleed off excess electrical energy generated during axis deceleration.

If the cooling fans degrade or accumulate grease, internal cabinet temperatures spike rapidly. This excessive heat triggers thermal trips on the servo amplifiers, causes CPU instability, and drastically shortens the lifespan of electronic components.

Teach Pendant Communication

The teach pendant is used for manual jogging, program editing, alarm diagnostics, and system recovery. Reliable operation depends heavily on stable DC power from the cabinet and the physical integrity of the pendant cable. Because this cable is frequently flexed, dropped, or pulled on the factory floor, wire fatigue typically develops gradually, showing up as an intermittent black screen or touch unresponsiveness before failing completely.

Related reading:

FANUC Teach Pendant Troubleshooting

Common FANUC Fault Symptoms & Troubleshooting

Most FANUC downtime stems from electrical instability, communication breaks, safety circuit interruptions, or worn mechanical components. Rather than swapping parts blindly, use the following categorical diagnostic maps.

Symptom Category 1: Controller Freeze or Blank Teach Pendant Screen

  • Observed Alarms/Behaviors: Teach pendant screen stays black upon startup; controller randomly reboots during production; system locks completely during boot phase; power LEDs fail to illuminate.
  • Potential Root Causes: Unstable AC factory power supply; tripped or damaged main circuit breaker; faulty step-down transformer; blown fuse on the DC power lines; internal short circuit in the Fanuc teach pendant cable; failed Power Supply Unit (PSU); main board/on-off circuit component damage.
  • Recommended Checks:
    • Measure incoming line voltage at the main breaker.
    • Inspect the teach pendant cable for deep kinks, punctures, or crushed shielding.
    • Verify status LEDs on the PSU inside the control cabinet.
    • Check the cabinet's internal DC bus voltage.

Symptom Category 2: Teach Pendant Interface Locked or Unresponsive

  • Observed Alarms/Behaviors: The display is visible, but the touchscreen does not register input; cursor movement is delayed; soft keys fail to operate; the pendant freezes entirely during program editing blocks.
  • Potential Root Causes: System software corruption or registry crash; motherboard hardware faults; faulty CPU or corrupted DRAM modules; degraded FROM/SRAM memory card; communication bus drop between pendant and baseboard; auxiliary axis control card error.
  • Recommended Checks:
    1. Turn off power, safely disconnect, clean, and reseat the teach pendant cable connections.
    2. Inspect the cable strain-relief boots at both the cabinet and pendant entries.
    3. Verify system memory allocations and check cooling fan operation directly over the CPU.

Symptom Category 3: Servo Power Cannot Be Enabled

  • Observed Alarms/Behaviors: Error indicator light remains active on the panel; magnetic contactors KM1 and KM2 fail to engage, preventing high-voltage power from reaching the servo system; fault codes display on screen.
  • Potential Root Causes: Internal short or hardware fault inside the servo amplifier; damaged motor windings or broken encoder lines; physical break in the emergency stop (E-Stop) loop; faulty E-Stop circuit board or failing panel board; welded or defective KM1/KM2 contactor relays; broken interconnecting cables.
  • Recommended Checks:
    1. Use a multimeter to trace continuity through the entire emergency stop chain.
    2. Read the specific diagnostic fault codes and check the onboard error LEDs on the faceplate of the servo amplifiers.
    3. Listen closely for a physical "click" from the KM1/KM2 contactors when attempting to clear faults.

Symptom Category 4: Robot Restricted to Manual (T1/T2) Mode

  • Observed Alarms/Behaviors: The robot functions perfectly during manual jogging via the teach pendant, but AUTO mode cannot be selected; the production line cannot command or start the robot program.
  • Potential Root Causes: Loss of Profinet, Ethernet/IP, or hardwired communication with the master PLC; I/O signal mapping mismatch or dropped safety inputs; defective hardware limits or axis overtravel switches; incorrect local/remote switch hardware configurations; software-controlled safety interlocks left active.
  • Recommended Checks:
    1. Check the status of PLC network communication lamps inside the cabinet.
    2. Verify the remote enable signals on the I/O status screen.
    3. Inspect safety fence limit switches and gate interlock signals.

FANUC Preventive Maintenance Procedures

Implementing regular, routine maintenance preserves path accuracy, limits backlash, and prevents sudden component failure.

Recommended Maintenance Schedule

Component Recommended Interval Action Required Risk if Omitted
Main Reducer Grease 10,000 Hours / 3 Years Full replacement of internal lubricating oil Accelerated gear wear, backlash, reducer lockup
Balance Cylinder Every 6 Months Lubricate both sides of the main cylinder shaft Axis imbalance, excessive J2/J3 motor strain
Robot Arm Batteries Every 12 Months Replace the 4 primary alkaline cells in the arm base Loss of encoder positioning data, mastering errors
Cabinet Battery Every 2–3 Years Replace the lithium cell on the main CPU motherboard Loss of system configuration, SRAM memory corruption
Cooling Fan Unit Every 6 Months Clean dust/debris and check physical fan rotation Cabinet overheating, intermittent CPU & servo trips
Pendant Cable Quarterly Inspect insulation, pins, and strain-relief boots Signal cross-talk, sudden communication loss

Tooling & Safety Requirements

Before starting any maintenance procedure, ensure the following items are prepared:

  • Required Tools: Complete metric hex key set, specialized grease/oil gun HG-70, manual grease gun (specifically for the balance cylinder), clean lint-free rags, and heavy-duty waste collection/trash bags.
  • Safety Equipment: Industrial safety helmet, lockout/tagout (LOTO) padlocks and tags, oil-resistant safety gloves, steel-toe safety shoes, high-visibility reflective vest, and an approved safety harness/rope if performing climbing work on large-payload models.

Step-by-Step Maintenance Execution

[1. Perform Full Backups]
[2. Secure Safe Posture]
[3. Lubricate Reducers (J1-J6)]
[4. Live Battery Exchange]

Step 1: System Data Backup

Always create a fresh MC (Memory Card) backup and an IMG (Image) backup via the controller's boot monitor or file menu before starting mechanical work. Verify the integrity of the backup file on an external storage drive to ensure a reliable recovery point if data is lost.

Step 2: Safety Initialization & Posture Setup

  1. Switch the robot mode key from AUTO to manual mode.
  2. Set the control cabinet key switch to T1 or T2 mode, ensure the teach pendant's deadman enabling switch is in the ON position, and depress the emergency stop button.
  3. Manually jog each axis individually at low speed to position the robot into its designated refueling posture. Note: Each FANUC model has a unique specified angle for each axis to ensure proper gravity draining and optimal grease filling.

Step 3: Reducer Lubrication Protocol

  1. Open the Oil Outlets: Use a metric hex key to unscrew the grease outlet plugs for the J1, J2, J3, J4, J5, and J6 axes. Keep clean rags ready to catch any initial overflow from internal pressure.
  2. Inject New Lubricant: Connect the HG-70 manual grease gun to the respective lubrication inlets. Do not use high-pressure pneumatic grease guns unless the pressure is strictly regulated below 0.15 MPa. High pressure will instantly rupture the internal rubber oil seals, causing grease to leak directly into the servo motor housings.
  3. The J5 & J6 Wrist Axis Sequence: The wrist assembly features a compact, shared lubrication design. You must oil the J5 axis first with its outlet open. Once new grease emerges from the J5 outlet, close the J5 plug tightly. Only after sealing J5 should you open the J6 outlet plug and begin injecting grease into the shared inlet to service the J6 reducer.
  4. Balance Cylinder Service: Use a standard manual grease gun to apply fresh lubricant evenly to both the left and right shafts of the main balance cylinder.
  5. Bleed Internal Pressure: Leave all grease outlet plugs OPEN. Manually jog the robot axes continuously for 10 to 20 minutes. This movement allows the newly added grease to circulate, expanding under friction and forcing old grease and trapped air pockets out. Once the internal pressure is completely normalized and grease stops oozing out, wipe the ports clean and screw the outlet plugs back in securely.

Step 4: Battery Replacement (Crucial Power Constraint)

⚠️ CRITICAL WARNING: You MUST keep the main control cabinet power turned ON during the entire battery replacement process. If you replace the batteries while the controller is powered off, all stored pulse coder positional data will be permanently wiped, forcing a time-consuming, manual zero-position mastering calibration.

  1. Robot Arm Base Batteries: Locate the battery box cover on the robot's mechanical base. Remove the cover, pull out the old cells, and insert fresh, FANUC-recommended primary batteries. Double-check the positive (+) and negative (-) installation orientation before sealing the compartment.
  2. Control Cabinet Motherboard Battery: Open the control cabinet door, locate the battery clip on the main CPU motherboard, and swap out the lithium backup cell. Do not yank the lead wires; carefully unclip the connector harness.
  3. Site Restoration: Gather all maintenance tools, store used rags in waste collection bags, clear the external emergency stop condition, cycle the system power once, and verify that no low-battery or torque alarms are present before returning the robot to production.

Frequently Asked Questions

How often should a FANUC robot be serviced?

Most FANUC units require comprehensive preventive maintenance every 10,000 operating hours or every 3 years. However, if the robot operates in harsh environments—such as high-temperature die casting, automotive painting, or abrasive grinding—the maintenance windows for cooling fan cleaning and lubrication should be shortened to 6-month intervals.


What happens if the FANUC encoder battery dies completely?

When the base batteries drain past a critical threshold, the optical encoders lose their absolute position tracking memory the moment the main cabinet loses power. Upon reboot, the system throws severe positioning alarms, and the robot will refuse to move until new batteries are installed and a full factory mastering and calibration sequence is performed.


Why does a FANUC teach pendant freeze or lock up randomly?

This issue is commonly traced to mechanical fatigue within the teach pendant cable, which breaks down the internal RS-422 or Ethernet communication pairs. Other frequent causes include unstable 24V DC lines from a failing PSU, overheating of the main CPU due to clogged cabinet filters, or bad sectors inside the FROM/SRAM memory modules.


Why will the robot only execute movements in T1/T2 manual modes?

This means the safety circuit or external interface has not cleared the robot for automatic operation. Check for dropped safety network connections with the master PLC, missing Remote Enable signals on your I/O matrix, dual-channel safety fence switch mismatches, or an un-cleared software interlock block.


Can running a FANUC robot on low or bad lubrication destroy the reducers?

Yes. Operating with degraded, broken-down, or insufficient grease increases metal-on-metal friction inside the RV or harmonic reducers. This leads to internal overheating, rapid gear wear, permanent loss of path accuracy (backlash), and eventual catastrophic mechanical binding of the joint.

Related FANUC Repair Guides

Explore the Full Guide: Industrial Robot Knowledge Hub  →  Repair & Troubleshooting Cluster

Explore the complete guide for troubleshooting, repair strategies, and component replacement across industrial robot systems.

🔧 Recommended Parts for Repair Guides

Key components commonly involved in repair guides issues and replacements.

Articolo precedente UR Joint Overload Error – Symptoms & Diagnostic Guide

Lascia un commento

* Campi obbligatori

Blog posts

Confronta Prodotti

{"one"=>"Seleziona 2 o 3 articoli da confrontare", "other"=>"{{ count }} di 3 elementi selezionati"}

Seleziona il primo elemento da confrontare

Seleziona il secondo elemento da confrontare

Seleziona il terzo elemento da confrontare

Confrontare