Skip to content

Robot Powers On But No Response? Teach Pendant & Cable Troubleshooting Guide

A robot that powers on but does not respond is one of the most confusing failures in industrial automation.

The control cabinet may appear normal. Servo power may be active. Yet the robot refuses to move, accept commands, or respond through the teach pendant.

Typical symptoms include:

  • Control cabinet powers on normally
  • Servo system appears active
  • Teach pendant freezes or becomes unresponsive
  • Robot will not execute motion commands
  • No obvious controller fault is displayed
  • System appears “alive” but completely inactive

In most real-world cases, this is not a full controller failure.

Instead, the problem usually originates from one of two critical layers:

  1. Teach pendant communication system
  2. Robot signal, encoder, or safety-loop cable system

This guide explains how to isolate the fault quickly and avoid unnecessary controller replacement.

Why a Powered Robot Can Still Become Unresponsive

Industrial robots rely on multiple communication and safety layers operating simultaneously.

Even if the controller and servo system receive power normally, the robot may still refuse operation if:

  • The teach pendant cannot communicate correctly
  • The emergency stop safety loop is interrupted
  • Encoder or signal cables lose communication
  • The controller detects unstable signal integrity

As a result, the robot may enter a protective lock state while still appearing fully powered.

This is why many “power on but no response” failures are actually communication or safety-loop problems rather than CPU or controller damage.

Fast Diagnostic Workflow

The fastest troubleshooting method is to isolate the failure layer step by step.

Step 1 — Check Teach Pendant Response

The teach pendant is the primary human-machine interface (HMI) between the operator and the robot controller.

When pendant communication becomes unstable, the entire robot may appear frozen.

Common Teach Pendant Symptoms

Typical warning signs include:

  • Black or blank screen
  • Frozen display
  • Unresponsive buttons or touchscreen
  • Boot looping during startup
  • Delayed interface response
  • No communication with controller

Most Common Root Causes

Pendant Cable Damage

Internal conductor fatigue is extremely common in high-flex pendant cables.

Connector Oxidation or Loosening

Even small connection instability can interrupt communication.

Internal Pendant PCB Failure

Moisture, vibration, or electrical aging may damage internal electronics.

Communication Signal Instability

EMI interference or shielding failure may corrupt pendant communication.

Critical Diagnostic Insight: The E-Stop Loop Closure Effect

One of the most misunderstood robot failures involves the emergency stop safety loop inside the teach pendant cable.

Industrial robot E-Stop systems are hard-wired directly into the safety architecture.

If the teach pendant cable becomes damaged, the controller may interpret the condition as:

“Emergency Stop Activated”

As a result:

  • Robot remains powered ON
  • Servo drives may still appear ready
  • Motion commands are blocked completely
  • System enters a safety-lock condition
  • No obvious motion alarm may appear

This creates one of the most frequently misdiagnosed field failures.

Many technicians mistakenly suspect:

  • Controller failure
  • Servo amplifier damage
  • Software problems

when the actual issue is a damaged pendant cable interrupting the safety loop.

Step 2 — Inspect Robot Signal & Communication Cables

If the teach pendant powers on but the robot remains unresponsive, the next critical area is the robot cable system.

Industrial robots depend on stable communication between:

  • Controller
  • Servo drives
  • Encoders
  • Safety circuits
  • Fieldbus modules

Even brief signal interruption can disable robot motion.

Common Robot Cable Failure Symptoms

Typical symptoms include:

  • Robot powers on but will not move
  • Communication timeout alarms
  • Encoder feedback loss
  • Intermittent recovery after restart
  • Random axis freeze during motion
  • Servo ready with no motion response

Most Common Cable-Related Causes

Internal Conductor Breaks

Repeated flexing gradually fractures internal copper conductors.

Shield Damage & EMI Interference

Compromised shielding destabilizes high-frequency communication signals.

Connector Pin Wear

Small resistance changes can interrupt encoder communication.

High-Flex Axis Fatigue

Axis 5 and Axis 6 cable zones experience the highest mechanical stress.

High-Frequency Failure Patterns Seen in the Field

Real-world industrial repair data shows several recurring patterns.

Teach Pendant Failure Patterns

ommon issues include:

  • Screen blackout after startup
  • Touchscreen lag or freezing
  • Communication disconnects
  • Internal moisture contamination
  • Random reboot behavior

Robot Cable Failure Patterns

Typical symptoms include:

  • Intermittent motion loss
  • Encoder communication instability
  • Axis freezing during high-speed operation
  • Motion-dependent communication faults
  • EMI-related instability in welding environments

Combined Failure Mode

In many systems, cable degradation affects multiple layers simultaneously.

Typical chain reaction:

  1. Signal cable degrades internally
  2. Communication becomes unstable
  3. Safety loop integrity is interrupted
  4. Pendant communication becomes unreliable
  5. Robot remains powered but unresponsive

This combined failure mode is extremely common in older robotic systems.

Recommended Troubleshooting Sequence

To reduce downtime and avoid unnecessary controller replacement, follow this order:

Step 1 — Verify Interface Layer

Check:

  • Teach pendant power
  • Screen response
  • Touch/button operation
  • Pendant connector stability
  • Cable flex points

Step 2 — Inspect High-Failure Components First

Prioritize components with the highest real-world failure rate:

These components fail far more frequently than the controller itself.

Step 3 — Reset & Validate Safety State

After replacing or reconnecting components:

  • Reset safety loop condition
  • Reboot controller
  • Perform low-speed motion testing
  • Monitor communication stability during movement

Pro Diagnostic Technique Used by Field Engineers

A fast isolation method commonly used in industrial maintenance:

Diagnostic Procedure

  1. Disconnect the teach pendant
  2. Reboot the controller
  3. Observe alarm behavior changes
  4. Reconnect using a known-good pendant or cable if available

Diagnostic Logic

If system behavior changes significantly after reconnecting:

The fault is very likely located in the pendant or cable layer rather than the controller itself.

This technique often saves hours of unnecessary controller-level troubleshooting.

Brand-Specific Replacement Solutions

Different robot manufacturers use different communication architectures and connector systems.

Always select replacement components based on robot platform compatibility.

FANUC Systems

Common focus areas:

  • Pendant communication
  • Pulse coder cables
  • Servo signal integrity
  • FSSB communication stability

Recommended components:

ABB Systems

Common focus areas:

  • FlexPendant communication
  • SMB communication loops
  • Resolver feedback integrity

Recommended components:

KUKA Systems

Common focus areas:

  • martPAD communication
  • EtherCAT signal stability
  • RDC communication

Recommended components:

Yaskawa Systems

Common focus areas:

  • Pendant communication stability
  • Sigma-series feedback integrity
  • Servo Pack communication

Recommended components:

High-Frequency Failure Patterns (Field Data Insight)

Teach Pendant Failures

  • Screen blackout after startup
  • Touch input failure or delay
  • Communication loss with controller
  • Internal moisture or contamination damage

Cable System Failures

  • Intermittent motion loss
  • Encoder signal disruption
  • Axis freeze during high-speed operation
  • EMI interference in welding environments

Combined Failure Mode

  • Cable degradation triggers pendant instability
  • Safety loop interruption locks system state
  • Robot appears fully powered but completely unresponsive

Recommended Solution Path

To avoid unnecessary controller replacement, follow this diagnostic sequence:

Step 1 — Interface Layer Check

  • Verify pendant power and response
  • Inspect cable flex zones and connectors

Step 2 — Replace High-Failure Components First

  • Teach pendant assembly
  • Robot signal / encoder cable

Step 3 — System Validation

  • Reset safety loop state
  • Perform low-speed motion testing

Pro Diagnostic Tip

A fast isolation technique used by field engineers:

  1. Disconnect teach pendant
  2. Reboot controller system
  3. Observe system alarm behavior
  4. Reconnect with known-good cable if available

If system behavior changes significantly, the failure is almost certainly in the pendant or cable layer, not the controller.

FAQ

1. Why does my robot power on but not respond?

In most cases, the issue is caused by:

  • Teach pendant communication failure
  • Robot signal cable interruption
  • Safety loop instability

rather than controller damage.

2. Can a damaged cable completely stop robot operation?

Yes.

A damaged signal or safety-loop cable can force the controller into a protective non-motion state even while power remains active.

3. Is controller replacement necessary in this case?

Usually not.

A large percentage of “robot powered but unresponsive” cases are resolved by replacing:

  • Teach pendant assemblies
  • Pendant cables
  • Encoder cables
  • Communication harnesses

before controller replacement is ever required.

4. How can I quickly confirm if the teach pendant is faulty?

Common indicators include:

  • Frozen or black screen
  • Delayed input response
  • Random disconnect behavior
  • Communication recovery after reconnecting cable

Using a known-good pendant is often the fastest confirmation method.

5. Why does E-Stop affect robot response even when no alarm is shown?

Because the emergency stop system is hard-wired into the robot safety architecture.

If the controller detects an incomplete E-Stop circuit, it may block motion entirely even when no obvious motion alarm appears.

Conclusion

A “Robot Power On But No Response” condition is rarely a controller failure.

In real-world diagnostics, the majority of cases originate from:

  • Teach Pendant system failure
  • Robot cable or signal degradation
  • Safety loop (E-Stop) interruption

Focusing on these layers first dramatically reduces downtime and avoids unnecessary controller replacement costs.

Explore the Full Guide: Industrial Robot Knowledge Hub  →  Repair & Troubleshooting Cluster

Explore the complete guide for troubleshooting, repair strategies, and component replacement across industrial robot systems.

🔧 Recommended Parts for Robot power on but no response

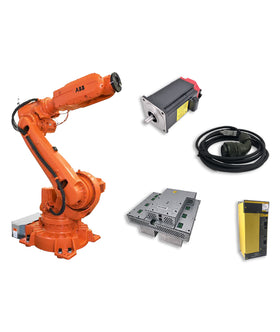
Key components commonly involved in robot power on but no response issues and replacements.

Previous article UR Joint Overload Error – Symptoms & Diagnostic Guide

Leave a comment on this topic

* Required fields

Blog posts

Compare products

{"one"=>"Select 2 or 3 items to compare", "other"=>"{{ count }} of 3 items selected"}

Select first item to compare

Select second item to compare

Select third item to compare

Compare