

When an industrial robot controller does not power on, the first assumption is often that the power supply has failed.
However, a controller that shows no display, no status indicators, or no response after the main power is switched on may have several possible causes.
The problem could be related to the incoming power supply, an internal power supply module, a control board, a wiring connection, or a protective circuit that prevents the controller from starting.
Replacing the wrong component can increase repair costs without solving the original problem.
Before ordering a replacement power module or circuit board, maintenance technicians should identify where the power interruption occurs.
This guide explains how to troubleshoot an industrial robot controller that does not power on, how to distinguish power supply, board, and wiring problems, and what information to collect before replacing a component.
A controller power-on failure does not always produce the same symptoms.
The first step is to identify exactly what happens when the controller's power switch is operated.
Common symptoms include:
No display or screen activity
No status indicators on the controller
Controller powers on briefly and then shuts down
Cooling fans do not start
Some indicators are active, but the controller does not complete startup
The controller repeatedly attempts to start
The Teach Pendant remains blank or does not establish communication
These symptoms can help narrow down the possible fault area.
For example, a completely unresponsive controller may indicate an incoming power or power distribution problem. If some indicators are active but the system cannot complete initialization, an internal power rail, control board, or communication-related issue may need further investigation.
However, symptoms alone cannot confirm which component has failed.
Before investigating internal controller components, confirm that the external power source is available and suitable for the robot system.
An interruption or abnormality in the incoming power supply can prevent the controller from starting.
Potential causes include:
Main power supply interruption
Incorrect supply voltage
Missing phase in a three-phase supply
Tripped circuit breaker
Blown external fuse
Damaged power cable
Loose or damaged power connections
Faulty main disconnect switch
The required input voltage and electrical configuration depend on the specific robot controller.
Do not assume that two controllers from the same manufacturer use identical power requirements.
A qualified electrical technician should verify the incoming supply against the controller's nameplate and manufacturer documentation.
Relevant checks may include:
Confirming that the correct electrical supply is available.
Checking the condition of the upstream circuit breaker and protective devices.
Inspecting the external power cable and accessible connections.
Checking whether any protective device has tripped.
Reviewing whether the failure occurred after a power outage, electrical maintenance, or facility power disturbance.
Do not repeatedly reset a breaker or replace a fuse without identifying why the protection operated.
If the incoming power is confirmed to be correct, the investigation can move toward the controller's internal power distribution system.
If the external supply is available but the robot controller remains unresponsive, an internal power supply problem becomes one possible cause.
Industrial robot controllers may contain power supply units that distribute different voltage rails to control electronics, interface circuits, and other system components.
A failure in one of these circuits can prevent the controller from starting normally.

Possible indicators include:
No internal status indicators
Controller remains completely inactive
Cooling fans do not operate
Startup begins but stops unexpectedly
A power supply alarm or diagnostic indication appears
Visible damage or abnormal odor around a power module
These symptoms are not conclusive. A failed downstream board or short circuit can also cause a power supply to shut down or enter protection mode.
Common possibilities include:
Component aging: Internal electronic components can deteriorate over time, particularly in systems operating continuously or in environments with elevated temperatures.
Overheating: Restricted airflow, blocked filters, failed cooling fans, or excessive cabinet temperature can affect power supply reliability.
Electrical disturbances: Abnormal input conditions or electrical events may damage internal power components.
Downstream electrical faults: A short circuit or abnormal load elsewhere in the controller may cause a power supply protection circuit to activate.
This distinction matters.
A controller may appear to have a failed power supply when the actual problem is a downstream circuit drawing abnormal current.
Replacing the power module without checking the affected circuit may cause the replacement to enter protection mode as well.
A qualified technician should follow the manufacturer's diagnostic procedure to verify the relevant supply outputs, protection status, and downstream loads.
Not every controller startup failure is caused by the power supply.
The controller may receive incoming power and have some internal voltage available, but still fail to initialize because of a control board or electronic module problem.
Possible symptoms include:
Power indicators are active, but startup does not complete.
The controller stops during initialization.
Status indicators show an abnormal pattern.
The system produces diagnostic or board-related alarms.
The Teach Pendant cannot establish communication with the controller.
The controller restarts repeatedly.
The exact symptoms depend on the controller architecture and the affected board.
Depending on the robot system, the fault may involve:
CPU or processor board
I/O board
Power distribution board
Communication board
Interface board
A control board may fail because of component deterioration, electrical damage, environmental contamination, overheating, or a fault elsewhere in the system.
Consider the following diagnostic approach:
| Observation | Possible Direction |
|---|---|
| No controller indicators or display | Incoming power or internal power distribution |
| Power indicators active, but no startup | Control board, internal supply rail, or initialization fault |
| Controller starts and then shuts down | Power protection, abnormal load, or internal fault |
| Board-specific diagnostic indication | Relevant board or connected circuit |
| Teach Pendant blank while controller indicators are active | Pendant power, cable, interface, or controller communication |
These are diagnostic clues, not definitive component-level diagnoses.
A board should not be replaced simply because the controller fails to complete startup.
Confirm the board identification, revision, controller compatibility, and diagnostic evidence before ordering a replacement.
Wiring faults are another important possibility when a robot controller does not power on.
A damaged or loose connection can interrupt power delivery or prevent communication between internal components.

Loose power connections
Damaged internal wiring harness
Burned or oxidized terminals
Incorrectly reconnected cables after maintenance
Damaged connectors
Broken conductors
Poor contact at a power distribution connection
Incorrect cable installation or routing
In some cases, a controller may have power in one section but not in another because a connection between power distribution components has failed.
Look for clues such as:
The controller stopped working after maintenance or component replacement.
The failure appeared after vibration or cable movement.
Visible connector damage or discoloration is present.
The problem is intermittent rather than permanent.
A cable or harness has been recently disturbed.
A visual inspection may help identify obvious damage, but it cannot confirm electrical continuity or insulation integrity.
Internal wiring inspections and electrical measurements must be performed by qualified personnel using the appropriate isolation and verification procedures.
Never reconnect or reseat internal controller connectors while the equipment is energized.
The following sequence provides a practical way to organize the investigation.
Before opening the controller cabinet, document what happens when the power switch is operated.
Record:
Whether the display turns on
Whether any status indicators illuminate
Whether cooling fans start
Whether the controller attempts to initialize
Whether alarms or diagnostic codes appear
Whether the failure is continuous or intermittent
Photographs or short videos can help maintenance teams compare the symptoms with manufacturer documentation.
Check the facility power supply and upstream protective devices against the controller's specifications.
If the incoming supply is unavailable or outside the specified range, investigate the external electrical system before replacing internal components.
If incoming power is confirmed, a qualified technician should follow the controller-specific service procedure to investigate internal power distribution and supply status.
Do not assume that a power supply module is defective just because the controller has no display.
If internal power is available, check the relevant board indicators and diagnostic information according to the manufacturer service manual.
Identify whether the controller is failing before initialization, during startup, or after a particular board or module becomes active.
With the system safely isolated, inspect accessible wiring and connectors for physical damage, loose connections, overheating, or signs of incorrect installation.
Any electrical testing should follow the manufacturer's approved procedure.
Once the fault area has been narrowed down, record the exact component part number and revision.
For power supplies and control boards, verify:
Original part number
Hardware revision
Controller model
Electrical specifications
Connector configuration
Approved replacement or supersession information
This is especially important when supporting older robot controller generations.
When a robot controller cannot power on, replacing the most obvious component may seem like the fastest repair.
However, the actual failure may be elsewhere.
For example:
Replacing a power supply without identifying a downstream short circuit may cause the replacement to enter protection mode.
Replacing a control board without checking its power supply may leave the original problem unresolved.
Replacing an internal cable without verifying its connector configuration may introduce another connection problem.
Installing a similar-looking board with a different revision may create compatibility or initialization issues.
A component should only be considered a replacement candidate after its identification and application compatibility have been checked.
If the original component is discontinued, confirm whether an officially approved replacement or documented alternative is available.
The replacement decision should be based on the confirmed fault rather than the initial symptom.
| Component | When Replacement May Be Required | Important Verification |
|---|---|---|
| Power Supply | Confirmed internal power supply failure | Output specifications, part number, revision |
| Control Board | Confirmed board-level failure | Board number, hardware revision, controller compatibility |
| Wiring Harness | Confirmed conductor or connector damage | Cable function, pinout, connector, length |
| Power Cable | Confirmed damage or incorrect electrical characteristics | Voltage rating, current rating, cable specification |
| Connector | Confirmed mechanical or electrical damage | Type, pin configuration, contact arrangement |
In some cases, repairing a connector or replacing a damaged cable may be sufficient.
In other cases, the entire module may require replacement.
The correct decision depends on the manufacturer's repair procedure, component availability, and the condition of the affected system.
If the controller cannot power on and a replacement component is required, preparing the correct information can help avoid ordering errors.
Send the following details when requesting a quote:
Robot Information
Robot manufacturer
Robot model
Controller model and generation
Failed Component Information
Component name
Complete part number
Hardware revision
Product label photos
Connector and mounting photos
Fault Information
Controller startup symptoms
Status indicator behavior
Any diagnostic codes
Whether the problem started after maintenance or a power disturbance
Purchase Requirements
Required quantity
Preferred condition: New, New Surplus, Refurbished, or Used
Delivery destination
Whether an approved alternative can be considered
If you are not sure whether the power supply, board, or wiring has failed, provide the controller model and photos of the affected components first. The fault does not need to be fully diagnosed before starting a parts inquiry.
A robot controller that does not power on may require a power supply, control board, power distribution component, or wiring replacement.
Identifying the correct part is essential, particularly when supporting older robot controller generations.
InRobots provides industrial robot spare parts sourcing for major brands including ABB, FANUC, KUKA, and Yaskawa.
Our product categories include:
Robot power supplies and power modules
Circuit boards and electronic control modules
Servo drives and related components
Robot cables and wiring assemblies
Teach Pendant components and connection cables
If you need a replacement component, send us the original part number, controller model, and clear product photos.
We can review the available information and help identify potential sourcing options.
Looking for a robot controller power supply or control board?
Contact InRobots for a Spare Parts Quote
Providing the original part number and controller model is the best starting point.
Possible causes include an interrupted incoming power supply, a tripped protective device, a damaged power cable, an internal power supply failure, a wiring problem, or a controller electronic fault. The actual cause must be confirmed through the controller-specific diagnostic procedure.
Yes. If the power supply does not provide the required voltage to the relevant controller circuits, the display and other electronics may remain inactive. However, a blank screen can also result from a display, communication, control board, or wiring problem.
A board failure may be suspected when the controller receives power but cannot complete initialization, or when diagnostic indicators point to a specific board. However, these symptoms are not sufficient on their own. Check the manufacturer's diagnostic procedure and verify the relevant power and connection conditions before replacing the board.
Yes. A loose, damaged, or incorrectly connected power or internal wiring connection can interrupt power distribution or prevent proper system operation.
Not automatically. Confirm the incoming power conditions and investigate the internal power distribution system before deciding whether the power supply is defective. A downstream electrical fault may also cause the power supply to shut down.
Not without compatibility verification. Confirm the complete part number, hardware revision, controller generation, and any manufacturer-approved replacement information. Similar appearance or numbering does not establish interchangeability.
Provide the original power supply part number, robot controller model, product label photos, electrical specifications where available, and the required product condition. If the part number is missing, clear photos and the controller model can help begin identification.
Need a replacement robot controller power supply, control board, or wiring component?
Submit Your Spare Parts Inquiry to InRobots
Send us the controller model, original part number, and component photos to start your inquiry.
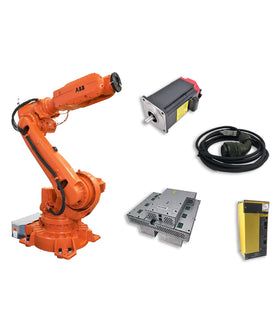
Key components commonly involved in issues and replacements.
No related parts found. Please check available components in our catalog.


{"one"=>"Seleccione 2 o 3 artículos para comparar", "other"=>"{{ count }} de 3 artículos seleccionados"}
Seleccione el primer artículo para comparar
Seleccione el segundo artículo para comparar
Seleccione el tercer elemento para comparar
Dejar un comentario