Error Code Overview
-
Error Code: KSS01405
-
Category: Drive / Servo System
-
Severity: High
-
System: KRC4 / KSP Drive Module
-
Impact: Drives not ready, robot cannot start motion
Quick Fix for KUKA KSS01405
If your robot displays KSS01405, start with these immediate troubleshooting steps before replacing any hardware:
Restart the KUKA Controller
- Power off the KRC4 controller
- Wait at least 10 seconds
- Restart the system completely
A full reboot can clear temporary startup, initialization, or communication faults.
Check KSP Module LED Status
-
Red blinking: Usually indicates communication or initialization fault
-
Red solid: Typically points to internal hardware failure
Verify Safety and Drive Enable Conditions
- Confirm all safety interlocks are cleared
- Ensure no emergency stop is active
- Verify drives are permitted to enable
Inspect KPP / KSP Power Supply
- Confirm proper DC bus voltage
- Check that the KPP module is operating normally
Check Drive Bus Connections
- Inspect drive bus cables and connectors
- Reseat loose or damaged connections
What Is KUKA KSS01405 KSP Not Ready Error?
KUKA KSS01405 indicates that the KSP servo drive module is not ready, preventing the controller from establishing a valid operational state.
System impact includes:
- Drives cannot be enabled
- axis movement blocked
- Robot startup halted
Typical real-world behavior:
- axis not ready during boot
- Robot remains idle after startup
- Red LEDon KSP module
- Startup sequence stalls
Often confused with KSP hardware faults (e.g., KSP 600-3x20 issues) or general drive initialization failures.
Common Symptoms
- axis not ready or cannot enable drives
- Robot remains in idle state
- Red LED blinking or solidon KSP
- Startup sequence stalls
- Drive readiness inconsistent after restart
Field Tip:
Compare LED status across multiple axes. Single-axis faults suggest localized KSP/KPP issues; multiple axes may indicate power supply or bus communication failure.
Common Causes of KSS01405
KSP Drive Module Failure
A failed or degraded KSP servo amplifier may prevent ready-state initialization.
Common reasons include:
- Internal electronic failure
- Overheating damage
- Aging components
- Startup circuit failure
KPP Power Supply Problems
If the KPP module cannot provide stable DC bus voltage, the KSP may never initialize properly.
Possible causes include:
- Low DC bus voltage
- KPP output instability
- Failed contactor or fuse
Drive Bus Communication Failure
Communication between the KRC4 controller and KSP may be interrupted by:
- Loose drive bus connectors
- Damaged communication cables
- EMI / electrical noise
- Poor cable shielding
Safety Circuit / Enable Signal Faults
Drives may remain blocked if safety requirements are not met.
Typical triggers include:
- Active emergency stop
- Open safety gate / interlock
- PLC enable signal missing
Firmware or Configuration Errors
Software mismatches can also prevent KSP initialization.
Examples include:
- Incorrect startup sequence
- Firmware mismatch between KPP/KSP
- Invalid system parameters
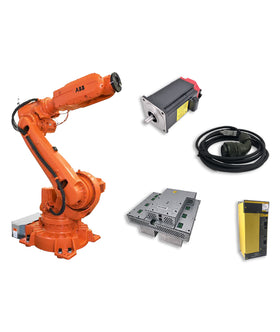
Recommended Replacement Parts
Common inspection or replacement targets:
- KUKA KSP 600-3x20 servo drive module (00-198-265)
- KUKA KPP 600-20 power supply module (00-203-241)
- Drive bus communication cables & connectors
- KRC4 interface boards
Compatibility Note:
Always verify robot model, part number, and KSS software version before installing replacement hardware.
Quick Diagnostic Flow
Simplified decision path for fast troubleshooting:
- Check KPP module LED
→ Green: Go to Step 2
→ Red: Inspect/replace KPP
- Check KSP module LED
→ Red Blinking: Check drive bus cable
→ Red Solid: Replace KSP module
- Check drive bus connections
→ Loose/damaged → repair/replace
- Restart controller & verify axis readiness
→ If issue persists: Replace module
How to Troubleshoot KUKA KSS01405
Pro Tip:
Before replacing the KSP, verify the Cabinet Control Unit (CCU) is communicating correctly. A faulty CCU can trigger KSS01405 even when the drive hardware is healthy.
Step 1 – Inspect KSP Module Status
- Observe LED pattern carefully
- Identify blinking vs solid red condition
Step 2 – Verify KPP Output Voltage
- Measure DC bus voltage
- Confirm KPP module status
- Check main power contactors
Step 3 – Check Safety Conditions
- Ensure no active E-stop
- Verify all safety circuits closed
- Confirm external PLC enable signal
Step 4 – Inspect Communication Path
- Reseat drive bus connectors
- Check cable integrity
- Inspect shielding / grounding
Step 5 – Replace Suspected Module
- Replace KSP if fault remains
- Follow KUKA replacement procedure
Pro Diagnostic Tips for KUKA KSS01405
- Use SmartHMI to check drive readiness status and logs
- Compare multiple axes to identify isolated issues
- Monitor startup sequence to detect failure points
- Check cabinet temperature and cooling performance
- Analyze repeated faults to predict hardware degradation
Prevention & Maintenance
- Inspect KSP/KPP modules for overheating
- Maintain cabinet ventilation and cooling
- Ensure stable power supply and grounding
- Perform routine drive diagnostics
- Replace aging modules proactively
💡 Recommended Inspection Cycle:
- Monthly: Check LEDs and cables
- Quarterly: Review SmartHMI logs
- Semi-annually: Evaluate module health
Related KUKA Errors
Drive & Servo Errors
Communication Errors
Safety & System Errors
FAQ About KUKA KSS01405
What does KUKA KSP not ready mean?
It means the KSP servo drive has not entered operational ready state, so the controller cannot enable the robot drives.
How do I fix KUKA axis not ready issue?
Start by checking the KSP module, KPP power supply, drive bus communication, and safety circuit status.
What causes KUKA KSP 600-3x20 failure?
Typical causes include overheating, component aging, unstable power supply, and internal hardware faults.
Can I reset KUKA KSS01405?
Temporary faults may clear after restarting the controller. Persistent faults usually require further diagnosis or hardware replacement.
Why is the KSP red LED stillon after restart?
Check the KPP module, safety interlocks, and drive bus connections first. If all are normal, the KSP may need replacement.


Leave a comment on this topic