Skip to content

Industrial Robot Servo Drive Cluster

Repair, Replacement & Troubleshooting Guide

Servo drives are the heart of industrial robot motion control, converting electrical commands from controllers into precise, high-torque movement at each joint. Proper selection, maintenance, and repair of servo drives directly influence robot accuracy, reliability, and uptime.

Whether you are managing an ABB, FANUC, KUKA, or Yaskawa fleet, understanding servo drive health is the single most effective way to minimize unplanned downtime.

1. What Is an Industrial Servo Drive?

A servo drive (also known as a Servo Amplifier) is a power modulator. It receives a command signal from the control system, amplifies it, and transmits electric current to a servo motor to produce motion proportional to the command signal.

Core Functions:

  • Signal Translation: Converts low-level signals into precise motor voltage/current.
  • Closed-Loop Feedback: Continuously monitors encoder or resolver data to correct positioning in real-time.
  • Dynamic Control: Governs axis position, velocity, and torque.
  • System Protection: Built-in safeguards against overcurrent, overvoltage, and thermal runaway.
  • Digital drives: offer precision control, network communication (EtherCAT, PROFINET), and programmability
  • Analog drives: simpler, legacy systems; rely on voltage/current input signals

2. Types of Industrial Robot Servo Drives

Digital vs Analog Drives

Brand-Specific Drives

Brand Popular Series Key Characteristics Typical "Pain Points"
FANUC αi / αiA / αiF Integrated into the R-30iB cabinets. HV (High Voltage) alarms; DC Link failures.
ABB ACS800 / ACS880 Modular structure; excellent for heavy payloads. Spindle communication errors; fan failures.
KUKA KSD / KSP / KPP Compact modules; highly integrated with KRC4. Over-temperature; KPP (Power Supply) faults.
Yaskawa Sigma / SGM High-speed response; multi-axis compatible. Feedback sensitivity; encoder cable noise.

3. Diagnostics: Common Failures & Causes

Identifying the "Why" behind a fault code is the difference between a 10-minute fix and a 10-hour shutdown.

Symptoms of Failure:

  1. Axis Jitter/Vibration: Often indicates a feedback loop error or gain parameter mismatch.
  2. Overcurrent Alarms: Suggests a short circuit in the motor windings or a failed IGBT in the drive.
  3. Position Deviation: The "Soft Limit" or "Path Deviation" error, usually linked to encoder signal loss.
  4. Communication Loss: No "Ready" signal to the PLC/Controller, often caused by damaged internal bus connectors.

Root Cause Matrix:

  • Electrical: Power surges, grounding issues, or aging capacitors.
  • Environmental: Dust accumulation causing heat-sink clogs, or oil mist ingress.
  • Mechanical: Excessive friction in the gearbox forcing the drive to pull higher current.

4. The "Repair vs. Replace" Decision Matrix

Should you send it for repair or swap it for new? Use this logic:

✅ Repair (Economic & Efficient)

  • Component Failure: Blown fuses, relays, or cooling fans.
  • Minor PCB Issues: Damaged voltage regulators or cracked solder joints.
  • Cost: Generally 30-50% the cost of a new unit.

❌ Replace (Critical & Necessary)

  • Burned Transistors (IGBTs): Often causes "carbon tracking" on the board, making repair unreliable.
  • Firmware/Logic Failure: Corrupted EEPROMs that cannot be reflashed.
  • Obsolete Models: When components for repair are no longer manufactured.

5. Structured Troubleshooting Flow

Follow these steps before pulling the drive out of the cabinet:

  1. Code Identification: Document the specific HEX or Alphanumeric code from the Teach Pendant.
  2. Cable Isolation: Swap the encoder/power cable with a known-good axis to see if the fault follows the cable.
  3. Thermal Check: Use an IR thermometer to check for hot spots on the drive casing.
  4. Input Power Verification: Ensure the DC Link voltage is within $\pm 10\%$ of the manufacturer’s specification.
  5. Master Reset: Attempt a controlled power cycle to clear "ghost" communication errors.

6. Maintenance Checklist (Preventative)

  • Quarterly: Inspect all cable connections for "wiggle" or loose terminal screws.
  • Bi-Annually: Clean or replace external cooling fans and filters.
  • Annually: Review "Current Draw" logs. A steady increase in an axis's idle current often predicts a mechanical or drive failure 3 months in advance.

FAQ

Q: Can I swap a drive between Axis 1 and Axis 2?

A: Often, yes—if the power ratings (kW) are identical. However, you must update the software configuration or dip-switch settings to reflect the new axis ID.

Q: Do I need to re-master (re-calibrate) after a drive replacement?

A: Not usually. Since the position data is stored in the encoder (with battery backup), swapping the drive doesn't lose the mechanical zero. If you replace the motor, you must re-master.

Q: Why does my drive fail immediately after a power outage?

A: This is usually due to "Inrush Current." Older capacitors inside the drive can fail when the power is suddenly restored

Explore the Full Guide: Industrial Robot Knowledge Hub  →  Industrial Robot Spare Parts

Explore the full guide to compare options and select the right components for your industrial automation needs.

🔧 Recommended Parts for Spare Parts

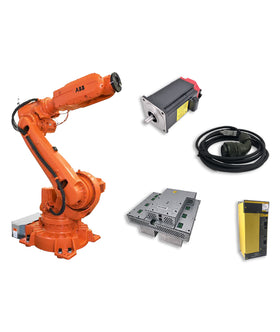
Key components commonly involved in spare parts issues and replacements.

No related parts found. Please check available components in our catalog.

Previous article Industrial Robot Cable Guide
Next article ABB Discontinued Parts & Replacement Guide

Leave a comment on this topic

* Required fields

Blog posts

Compare products

{"one"=>"Select 2 or 3 items to compare", "other"=>"{{ count }} of 3 items selected"}

Select first item to compare

Select second item to compare

Select third item to compare

Compare